<img src="https://ws.zoominfo.com/pixel/Nfk5wflCTIIE2iSoYxah" width="1" height="1" style="display: none;">

Lift Bulk Property Upload Tool
Support Documentation

To have easy access to the app, we recommend bookmarking the launch page. You will need to access this page to go through the launch process each time you use the app for authorization purposes. Below you'll find all the instructions on how to:

  • Install the app
  • Upload properties
  • Uninstall the app
  • Navigate common errors
  • Navigate limitations

If you can't find what you're looking for or have any questions, please contact Customer Support.

If you think something is wrong with the interface, check the Maintenance Status page first for any outages before contacting Customer Support (if applicable).

Prerequisites to installing the app: 

  • Have user access to a HubSpot portal.

How to Install:

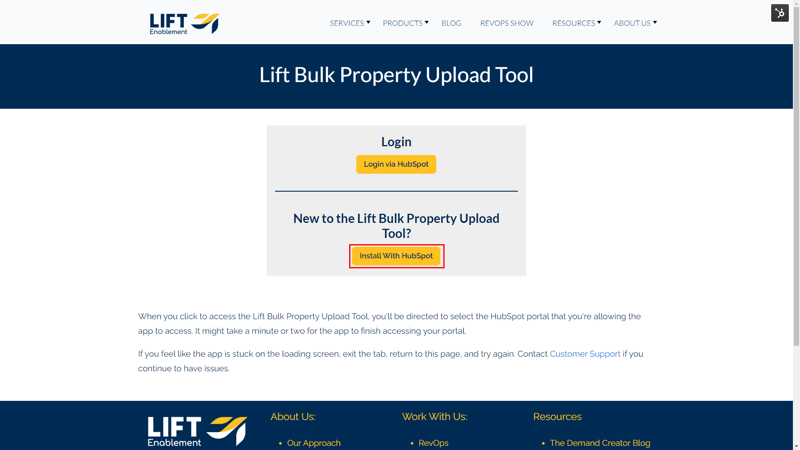
1.  On the access page, click on the button, "Login With HubSpot."

Lift Bulk Property Upload Tool Access Page

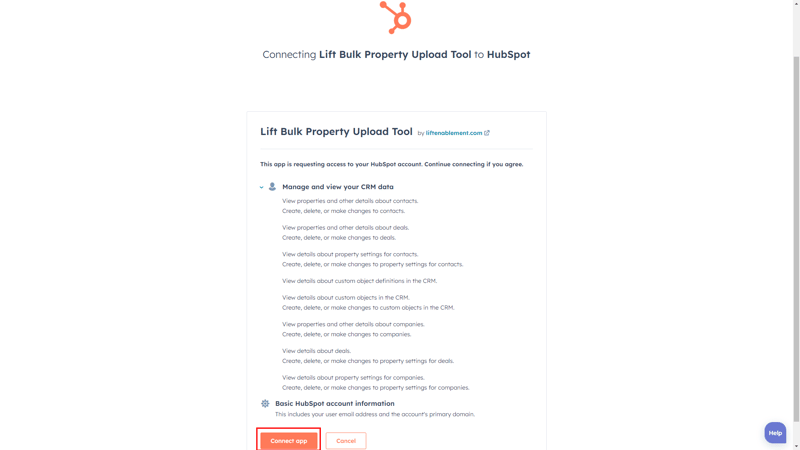
2. Connect your HubSpot portal
Note: HubSpot will have you confirm the authorization to utilize the app with CAPTCHA.

Lift Bulk Property Upload Tool Connect HubSpot

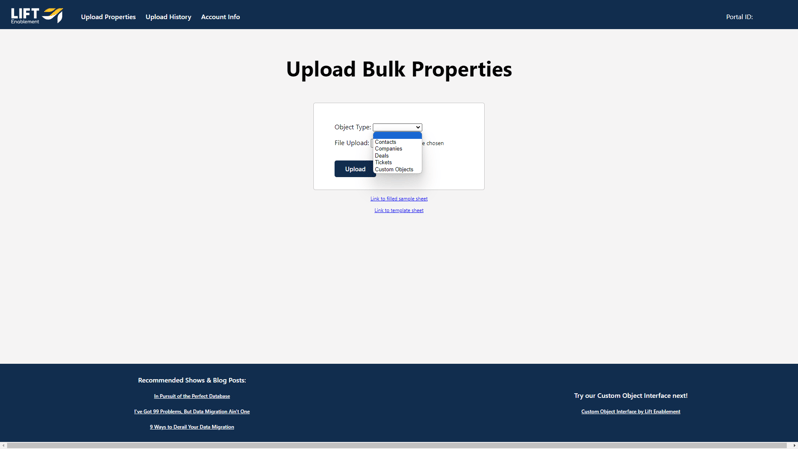
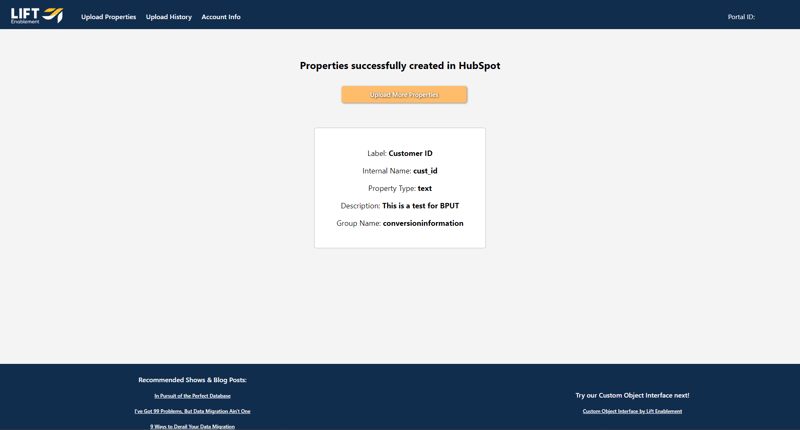
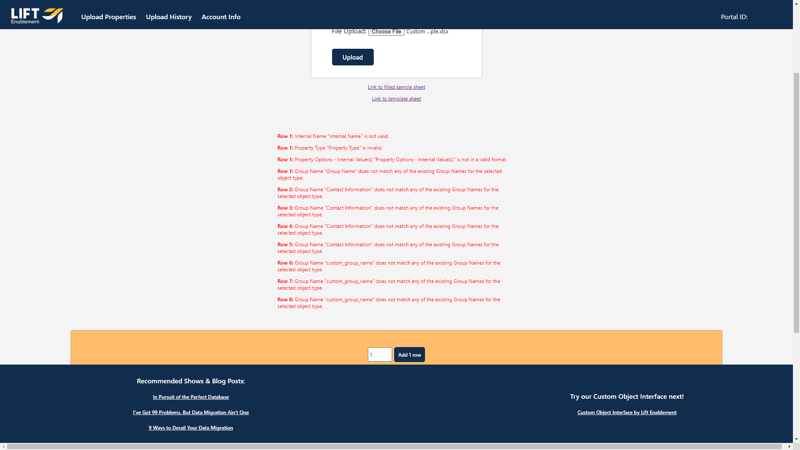
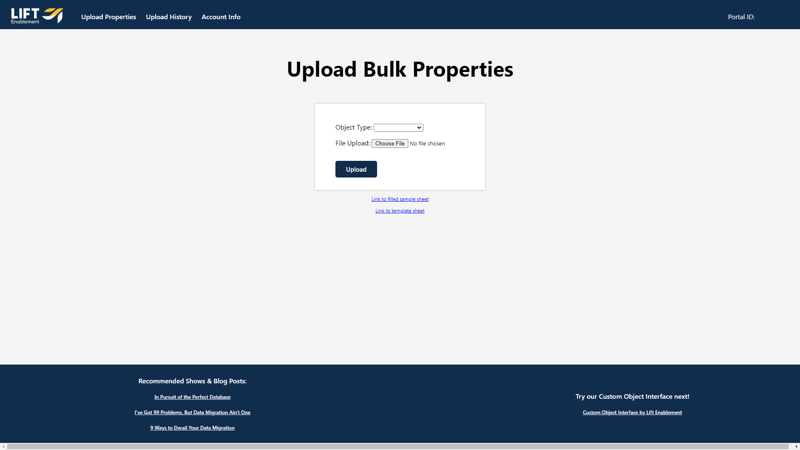
The Lift Bulk Property Upload Tool will now be connected. You'll be redirected to the main screen to upload your property spreadsheets.

Lift Bulk Property Upload Tool Main Page
If the page doesn't redirect after a few minutes, go back to the launch button and try it again. 

To continuously have easy access to the app, we recommend bookmarking the launch page. You will need to access this page to go login to the app.

To have easy access to the app, we recommend bookmarking the launch page. You will need to access this page to login to the app.

1. On the main page, select an Object Type

Lift Bulk Property Upload Tool Object Type

2. Choose a file to upload

Note: This file should be a .xlsx

Lift Bulk Property Upload Tool Select Excel Spreadsheet

If you would like to see a filled out sample sheet, click the link, "Link to filled sample sheet" below the upload box. 

You can also access a template sheet by clicking the link, "Link to template sheet" below the upload box.

Lift Bulk Property Upload Tool Main Page Links

Note: You will need to make a copy of the template sheet before you can use the template.

Lift Bulk Property Upload Tool Make a Copy
3. Once a file has been chosen, a table with all your property information will appear below the upload box.

Note: You can add rows to include more properties after choosing your file. Put the number of rows into the box above the table and click "Add x rows." You can also update any information directly in this table before you upload your properties.

Lift Bulk Property Upload Tool Blank Row

4. Click the upload button.

Lift Bulk Property Upload Tool Upload

5. Your properties have now been uploaded. You'll get a receipt of all the properties that were uploaded to HubSpot.

Lift Bulk Property Upload Tool Properties Successfully Uploaded

Bonus: If you'd like to review your upload history, click on "Upload History" in the navigation to see all of your previous property uploads.

Lift Bulk Property Upload Tool Upload History Nav
Lift Bulk Property Upload Tool Upload History


Before you uninstall the app, make sure you truly want to uninstall the app.  

To Uninstall: 

1. In your HubSpot portal, go to Settings located at the top right-hand side of your screen. 

Lift Bulk Property Upload Tool Portal Settings

2. On the left-hand side of your screen, click on the "Integration" drop-down item and select "Connected Apps." 

Lift Bulk Property Upload Tool Connected App Settingws

3. Find the Lift Bulk Property Upload Tool app, click on "Actions" under the name and choose "Uninstall." 

Lift Bulk Property Upload Tool Connected Apps
Lift Bulk Property Upload Tool Uninstall Button

4. Type "uninstall" in the box that appears.

Lift Bulk Property Upload Tool Uninstall Prompt

5. Finally, give a reason why you are uninstalling the app.

Lift Bulk Property Upload Tool Uninstall Reason


We understand it isn't fun when you go to upload your properties and are met with a screen like this with errors popping up.

Lift Bulk Property Upload Tool Errors
Thankfully there are easy fixes. Below are common errors and how to solve them.

Incorrect Property Group Name

This error occurs on an upload for a Custom Object and appears because HubSpot's Group Name Labels and Internal Names differ. For example, the Label and Internal Name for the same Custom Object could be "Project Information" (Label) and "projects_information" (Internal Name), which confuses the tool.

To fix: Make your Group Label plural, as in "Projects Information." If you are still having trouble, please reach out to Customer Support.

Need "Options" for a Single-Checkbox Property

To fix: Add "True, False" to the "Property Options - Label(s)" field and "true, false" to the "Property Options - Internal Name(s)" field.

Upload Failed with an Unclear Reason

This error occurs because the property already exists in HubSpot. Please check HubSpot for the property. 

If the property exists, exclude it from your upload. If the property doesn't already exist in HubSpot, please reach out to Customer Support.

There are currently a few limitations with the Lift Bulk Property Upload Tool due to how HubSpot is set up. Below are the common limitations you can run into and their workarounds.

Property Types That Aren't Accommodated

The properties that cannot be accommodated currently include:

  • HubSpot User
  • Rich Text
  • Calculation
  • Formatted Text (Phone Number)
  • Formatted Number
  • Currency
  • Score
  • File

Workaround: You will have to set up the property as a "Single-line text" Property Type. Once uploaded to HubSpot, you will be able to go into the property and update the field type. 

Lift Bulk Property Upload Tool Field Type Change